Steps to Create a Blinking LED Project
1
Open OmniBoard Studio and create a new project.
2
Drag and drop the necessary blocks to create a node diagram that turns an LED on and off.
Try to explore and make the diagram you self or click here and find out one of the solutions. ▼
- ● Place Start block.
- ● Connect the Start block to a While True block to create an infinite loop.
- ● Then connect the While True block to a Toggle LED block. This will cause the LED to toggle between on and off states.
- ● Finally connect the Timer block to the Toggle LED block. This will create the desired blinking effect. You can adjust the timer duration to change the blinking speed as you wish. (1000 milliseconds = 1 second)

3
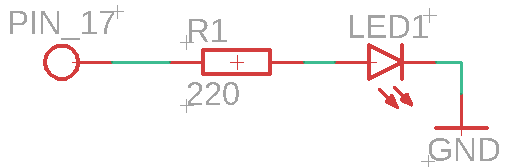
Make the correct circuit
- ● Connect the GPIO pin asigned to the LED to the rezistor.
- ● Connect the positive leg of the LED to a resistor, and then connect the other end of the LED to ground. You can determine which leg is positive and which is negative by finding the longer leg (positive) and shorter leg (negative) or flat side of the LED cover (negative).
4
Compile the code and upload it to your microcontroller.
5
Watch your LED blink on and off at the interval you set with the Timer block!
Bonus informations
- Here is an example of simplified the MicroPython code that would be generated by the blocks for a blinking LED project:
import machine # Needed for controlling the GPIO pins
import time # Needed for creating delays
led = machine.Pin(2, machine.Pin.OUT) # Asign GPIO pin 2 to control the LED as and output
while True: # Create an infinite loop to keep the LED blinking
    togle(led) # Toggle the LED on and off.
                 This is a custom function that would be generated by the blocks.
                 It would turn the LED on if it's currently off, and turn it off if it's currently on.
    time.sleep(1) # Wait for 1 second before toggling again
import time # Needed for creating delays
import RPi.GPIO as GPIO # Needed for controlling the GPIO pins
GPIO.setmode(GPIO.BCM) # Set the GPIO mode to BCM
GPIO.setup(2, GPIO.OUT) # Asign GPIO pin 2 to control the LED as and output
while True: # Create an infinite loop to keep the LED blinking
    togle(pin=2) # Toggle the LED on and off.
                   This is a custom function that would be generated by the blocks.
                   It would turn the LED on if it's currently off, and turn it off if it's currently on.
    time.sleep(1) # Wait for 1 second before toggling again